
Short answer: to export a BOM from Inventor, open the assembly, go to Assemble → Manage → Bill of Materials, click Export Bill of Materials, pick the Structured or Parts Only view and save it as an Excel or text file. The export takes a minute. Getting data out that your ERP or purchasing team can use without cleanup is the real work.
Here is how it usually goes. The assembly is released, someone exports the BOM, and the spreadsheet lands on a desk in purchasing. Then the questions start. Why are the screws listed twice? Where did this phantom part come from? What is the blank size for the sheet metal brackets?
None of that is a failure of the export button. It is what the model told Inventor. So this guide covers both halves: the export itself, and what to fix before you press it.
1. Decide which BOM you actually need
Inventor keeps more than one view of the same bill of materials, and they answer different questions.
- Structured keeps the assembly hierarchy, with subassemblies as their own items. Choose first level only or all levels. This is usually what an ERP needs to build a multi-level item structure.
- Parts Only flattens everything into a list of parts with total quantities. This is what purchasing wants when ordering.
Both views have to be enabled in the Bill of Materials dialog before you can export them. Autodesk’s Bill of Materials reference explains what each column and view does.
2. Export a BOM from Inventor with the Bill of Materials dialog
- Open the assembly and click Assemble → Manage → Bill of Materials.
- Click Export Bill of Materials, the first icon at the top left of the dialog toolbar. Not the Export… button at the bottom: that one saves the BOM template, not the BOM.
- Select the view to export. For Structured, choose the levels you want.
- In the save dialog, choose the file type (Excel or a text format such as CSV), name the file and save.
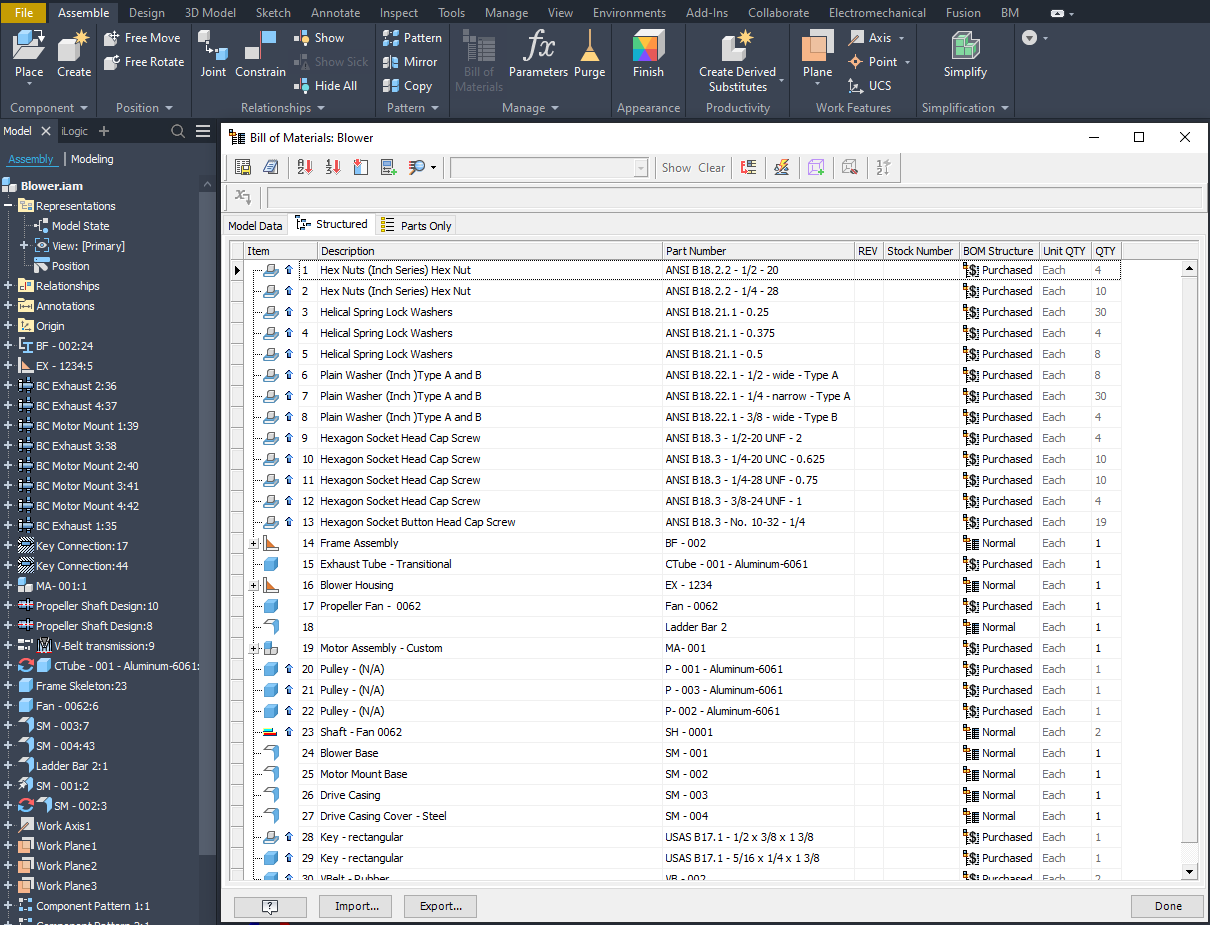
The spreadsheet formats need Microsoft Excel installed on the same machine. Autodesk’s own steps are in To Export a Bill of Materials to a Spreadsheet or Text file.
Use it when: you need the full assembly data and the BOM in the model is already clean.
3. Export the parts list from the drawing instead
If the drawing’s parts list is the document your company releases, export that. Double-click the parts list on the sheet (or right-click it and choose Edit Parts List), then click Export in the toolbar of the Parts List dialog. It saves to a spreadsheet or text file, as described in Autodesk’s Export Parts List reference. Under Options in the save dialog you choose the exported columns, the starting cell and an Excel template.
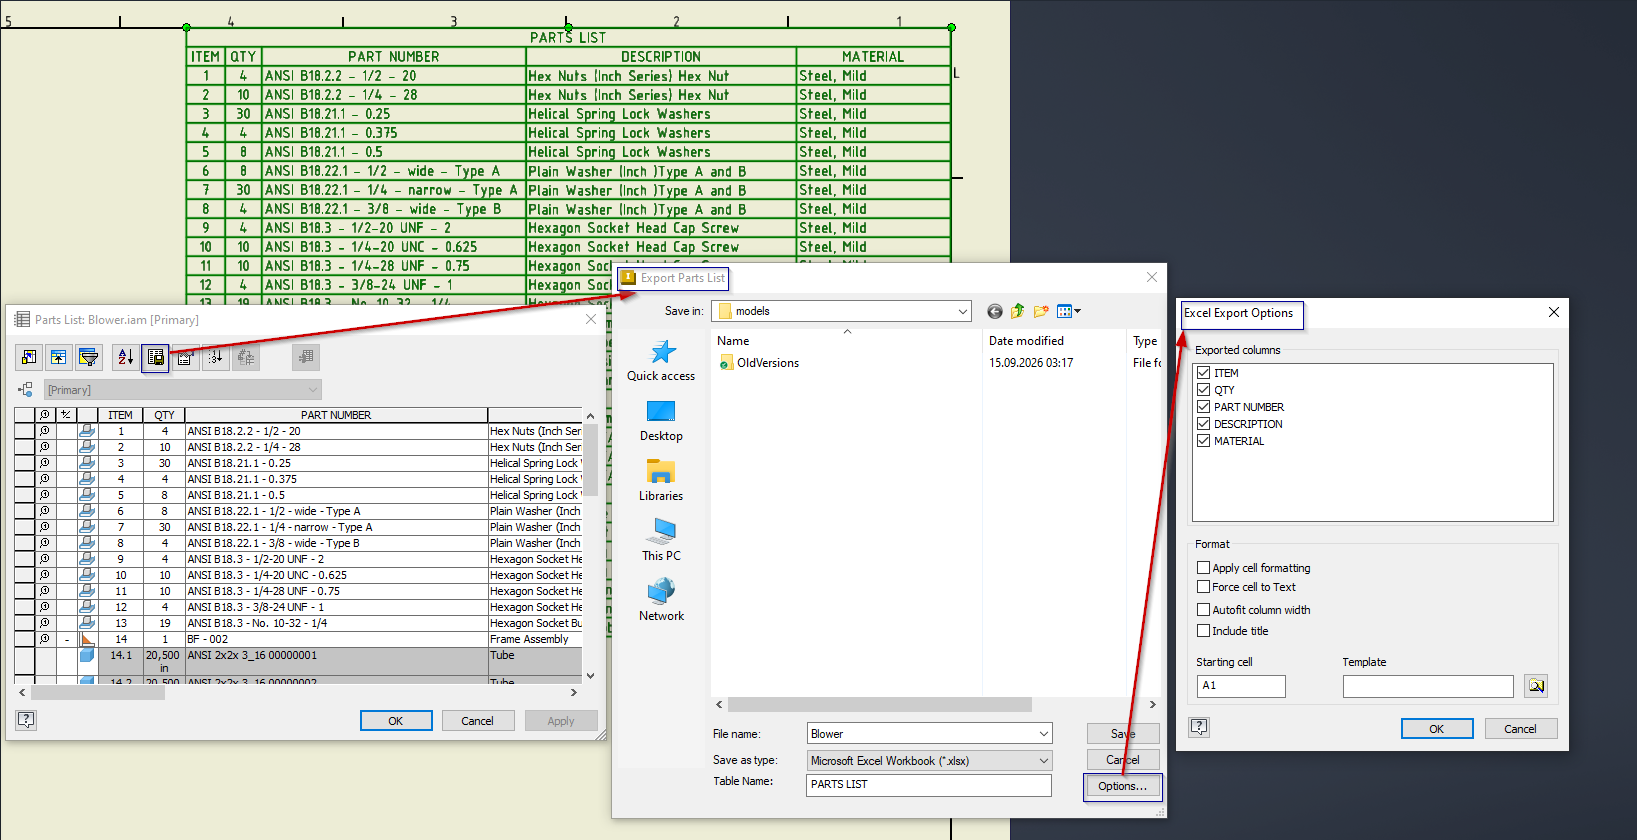
The catch: a parts list can be filtered, sorted and overridden on the drawing. That is useful on paper, but it means the export shows what the sheet shows, not necessarily what the model contains.
4. Fix the data before you export
Most “wrong BOM” complaints come from the model, not the export. Check these four things first:
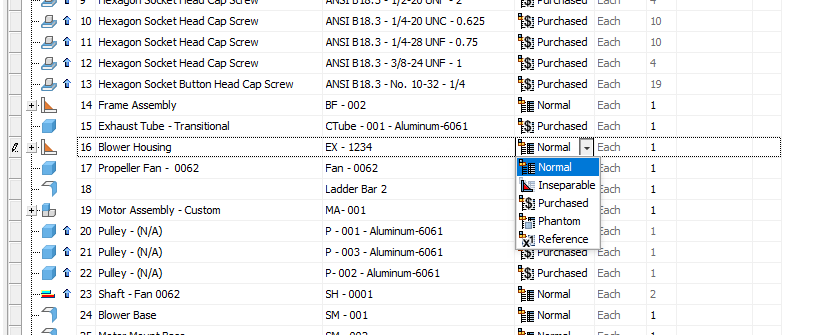
- BOM structure per component. Purchased, phantom and reference components behave differently in the list. A weldment or kit set to the wrong structure appears twice or not at all.
- Part numbers from iProperties. If the part number is the file name by default, your ERP receives file names. Fill the Part Number property deliberately.
- Quantity overrides. A quantity typed over in the BOM stays there when the model changes. Remove overrides you no longer need.
- Units. Mass and length columns follow the document settings. Agree one unit with whoever imports the file.
5. Automate the export with iLogic
If you export the same view the same way every time, a short iLogic rule does it in one click. The Inventor API exposes each BOM view and an Export method:
Dim doc As AssemblyDocument = ThisApplication.ActiveDocument
Dim oBOM As BOM = doc.ComponentDefinition.BOM
oBOM.PartsOnlyViewEnabled = True
Dim outPath As String = System.IO.Path.ChangeExtension(doc.FullFileName, ".xlsx")
oBOM.BOMViews.Item("Parts Only").Export(outPath, FileFormatEnum.kMicrosoftExcelFormat)
Autodesk’s BOM functions reference for iLogic covers the rest.
The catch: the view name is localised. On a German Inventor it is not “Parts Only”, so a rule written on one seat can fail on another. Test it on every language your team uses.
6. Export the BOM into your own Excel template with Axcast
If nobody on the team writes iLogic, or the list has to land in a company form, our Axcast add-in does the export from one dialog.
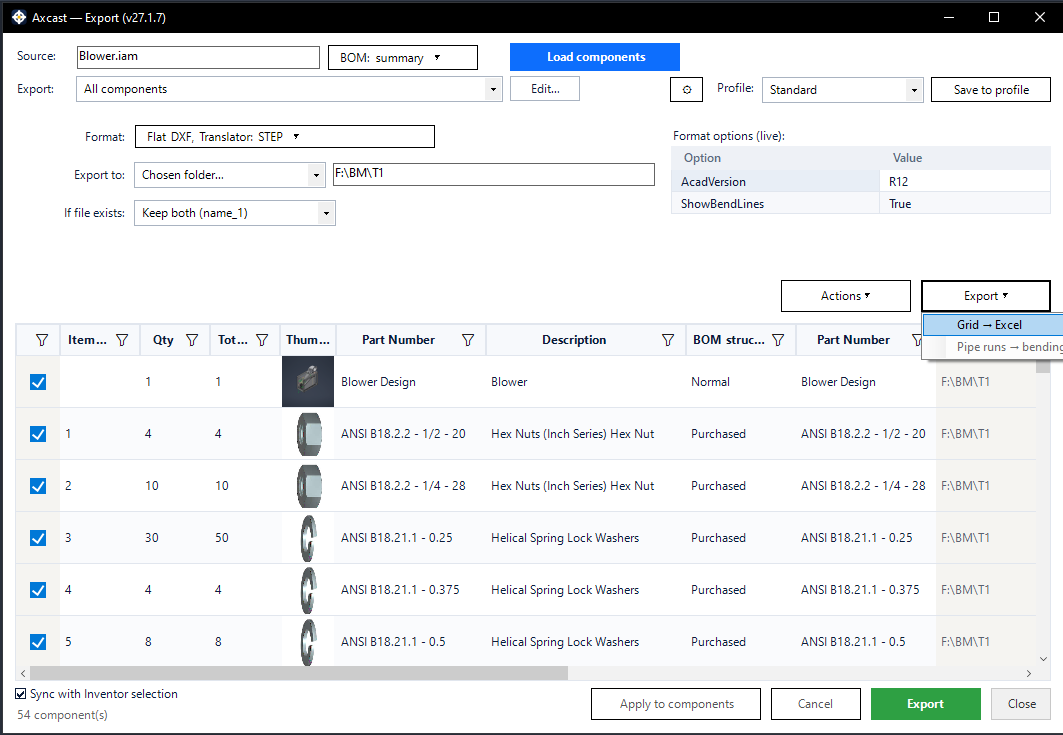
- Pick the source. The whole assembly down to the BOM depth you choose, only the components selected in Autodesk Inventor, everything that matches a saved filter, or a folder of files.
- Pick the columns. Any iProperty or BOM property can be a column. Rename the headings to what purchasing or your ERP import expects, and put them in order.
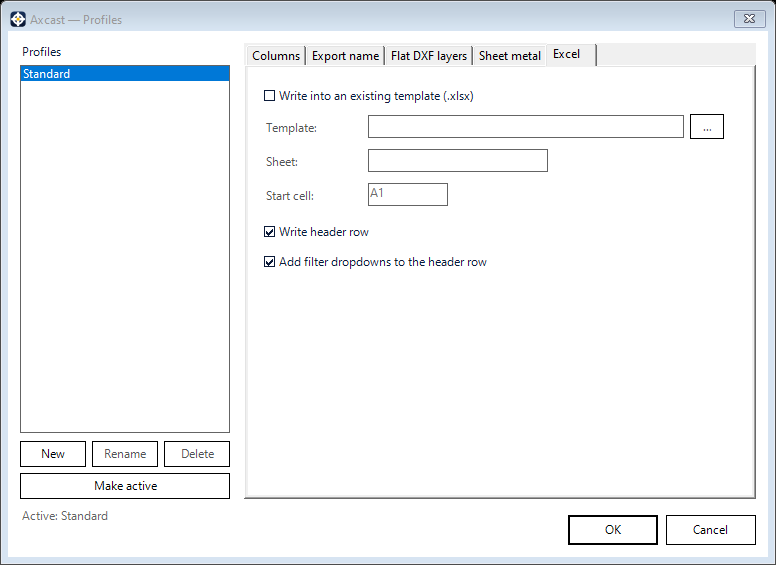
- Write it to Excel. Grid → Excel writes the list as you see it, with a header row, filter dropdowns, the header frozen and the print area set. Or point Axcast at your company’s own .xlsx template, a sheet and a start cell, so the headings and logo above stay intact. The template itself is not overwritten.
- Save it as a profile. Columns, Excel setup and file naming are stored per profile, so the next export is one click.
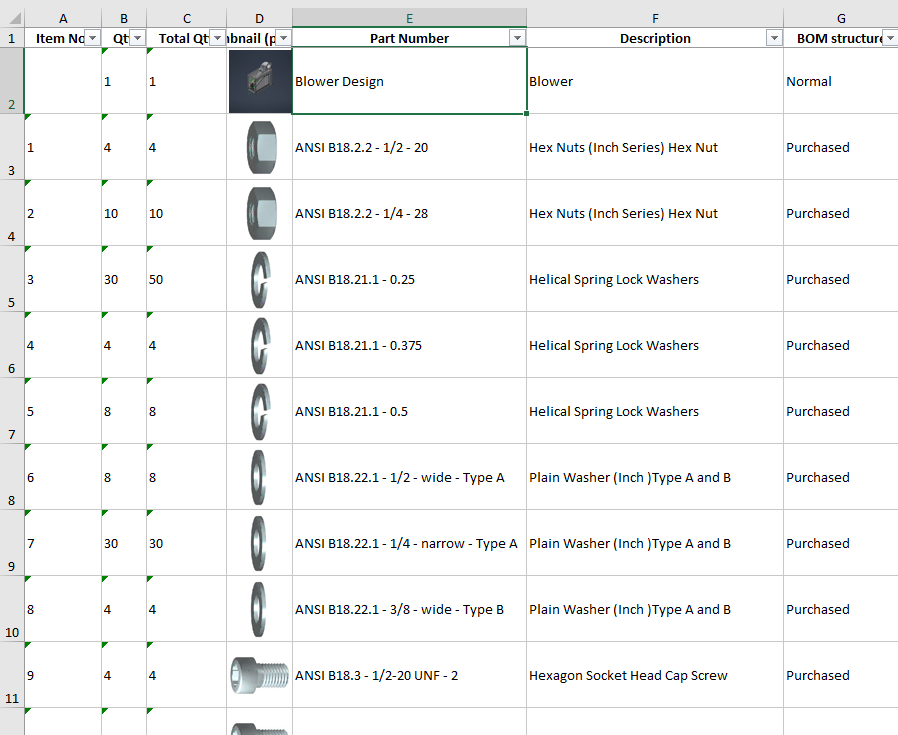
The same dialog also exports the components as STEP, PDF, DXF and the other formats your Autodesk Inventor installation can write, in one batch run. How the Excel output works in detail: Axcast Excel output.
Use it when: the same export repeats and the list has to match a fixed form.
The catch: Axcast needs Autodesk Inventor 2022 or newer.
7. Sheet metal: the blank size is the column everyone asks for
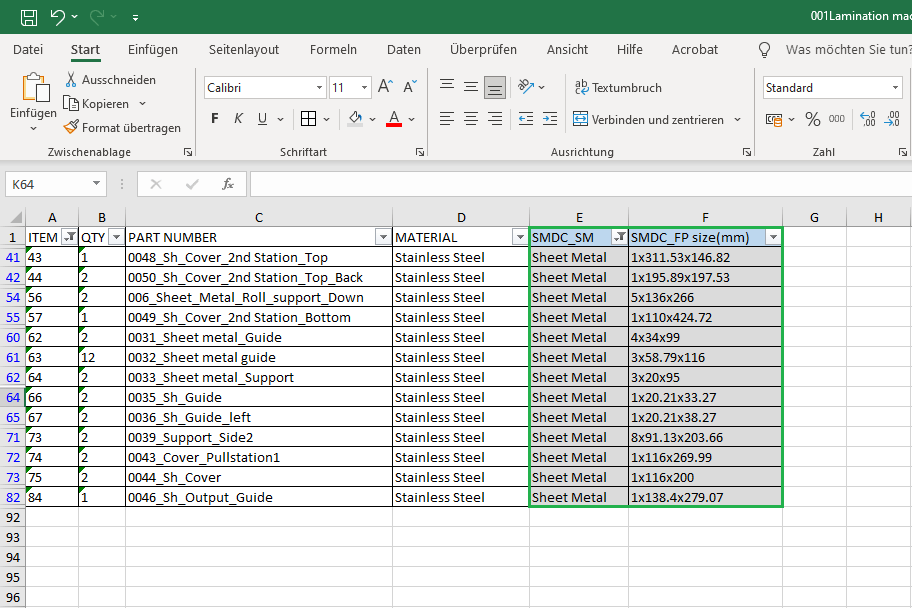
Purchasing and the laser shop want the flat pattern size of every sheet metal part. Inventor does store it on each part as iProperties (Sheet Metal Width, Length and Area), but it is not in the default BOM columns, and the flat pattern has to exist before there is a size at all.
This is one of the jobs our SMDC add-in handles: it generates an Excel parts list that includes the flat pattern size, together with DXF files of the flat patterns and STEP files of the assembly and parts.
When a file export is not enough
If someone still retypes the exported list into the ERP, the file is only half the job. The other half is a link that writes parts lists and item data straight into the import your ERP already offers. We explain how that is built, and when your ERP vendor’s own connector is the better choice, on our Inventor ERP integration page.
In order, stopping as soon as the problem goes away:
- Clean the BOM structure and part numbers in the model.
- Export the view the receiver actually needs.
- Automate the export with iLogic or Axcast if you repeat it.
- Link it to the ERP if someone still types it in.
Our add-ins for Autodesk Inventor 2018–2027 come with a 15-day free trial. Browse the add-ins.